FRI:DAY
FRI:DAY Versicherungen is an insurance startup that’s turning the German up on its head by offering pay-per-kilometer for car insurance and other new insurance products in the notoriously conservative German market. Since people don’t switch insurance easily it’s a behemoth of a marketing task to convince them to change. A startup’s website and their content marketing plays a huge role in making this happen.
Content managers at Friday.de need full control
A content marketing team together with SEO and performance marketing experts often want full control of a website, so they can execute on marketing efforts without having to coordinate with a separate development team. This keeps content marketing tasks immediately actionable.
So how do you do this while maintaining good looking landing pages?
At Makers’ Den our recipe included:
A well defined design system, implemented as React components
Prismic.io , a headless CMS to allow content managers to create new pages using predefined website sections (slices)
GatsbyJS - a static site generator - which pulls content from Prismic, and outputs blazingly fast web pages which Google loves.
I’ll go into the detail of each in separate sections, starting with the design system.
A well defined design system
My colleague Harrison has written about the technical implementation details of creating a low level design system with React, styled components and styled-system . If you don’t have one then it’s completely fine theming some pre-existing component library as well. You’ll find dozens of these in the React ecosystem. Once you have your primitive elements like typography, colors, spacings, links, buttons, cards, icons, grids and various image containers, you should design your website sections using these.
A sectional web page
Most marketing sites follow a pattern of being sectional. It’s easy to reason about, the UX is straight-forward and well understood. There are no issues with accessibility from quirkier UX and documents reading from top to bottom is basically how the web was designed to be consumed so it just plays well with all parties involved, including crawlers. Making these sites responsive is as easy as making sure each section is independently responsive. Users know what to expect and it just works.
Below we have an example of a long landing page from friday.de starting with a typical Hero section, followed by various sectional components. This page was built by a content manager without any developers being involved.
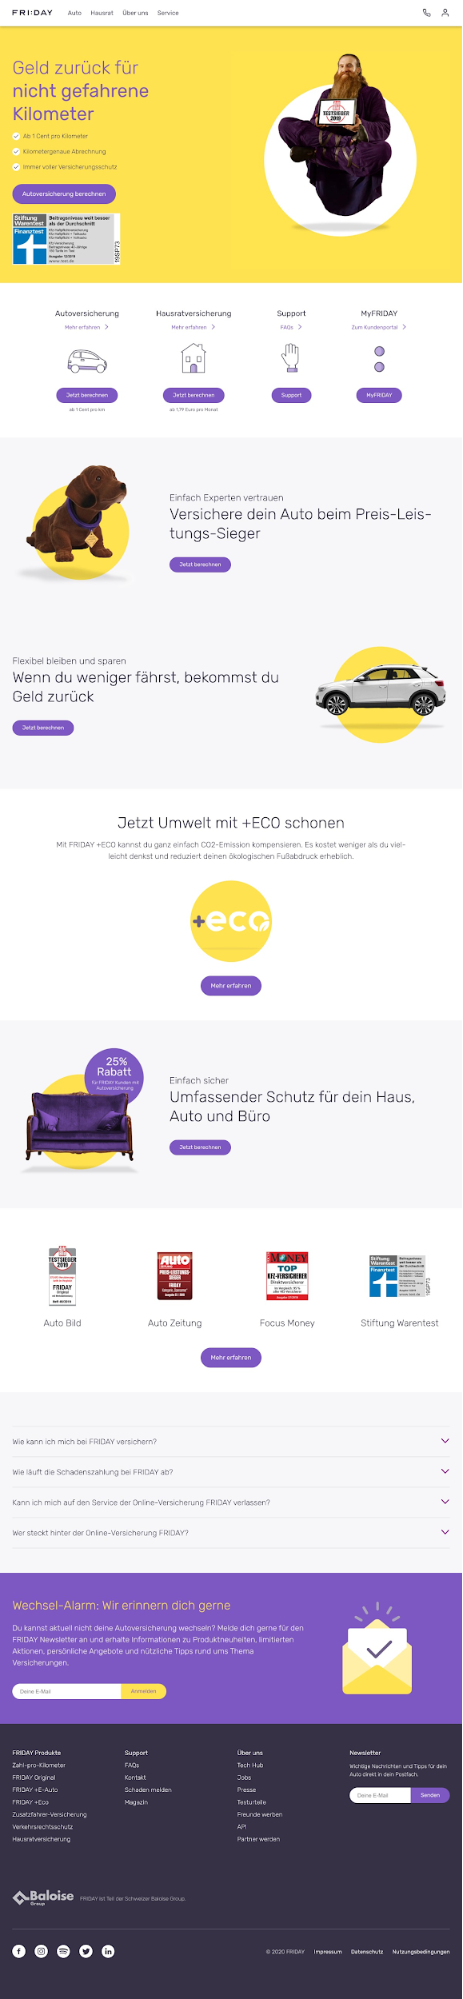
Section examples from Friday.de
The following section is a list of arbitrarily many items, where each item has title, link, icon, link button and an optional caption.
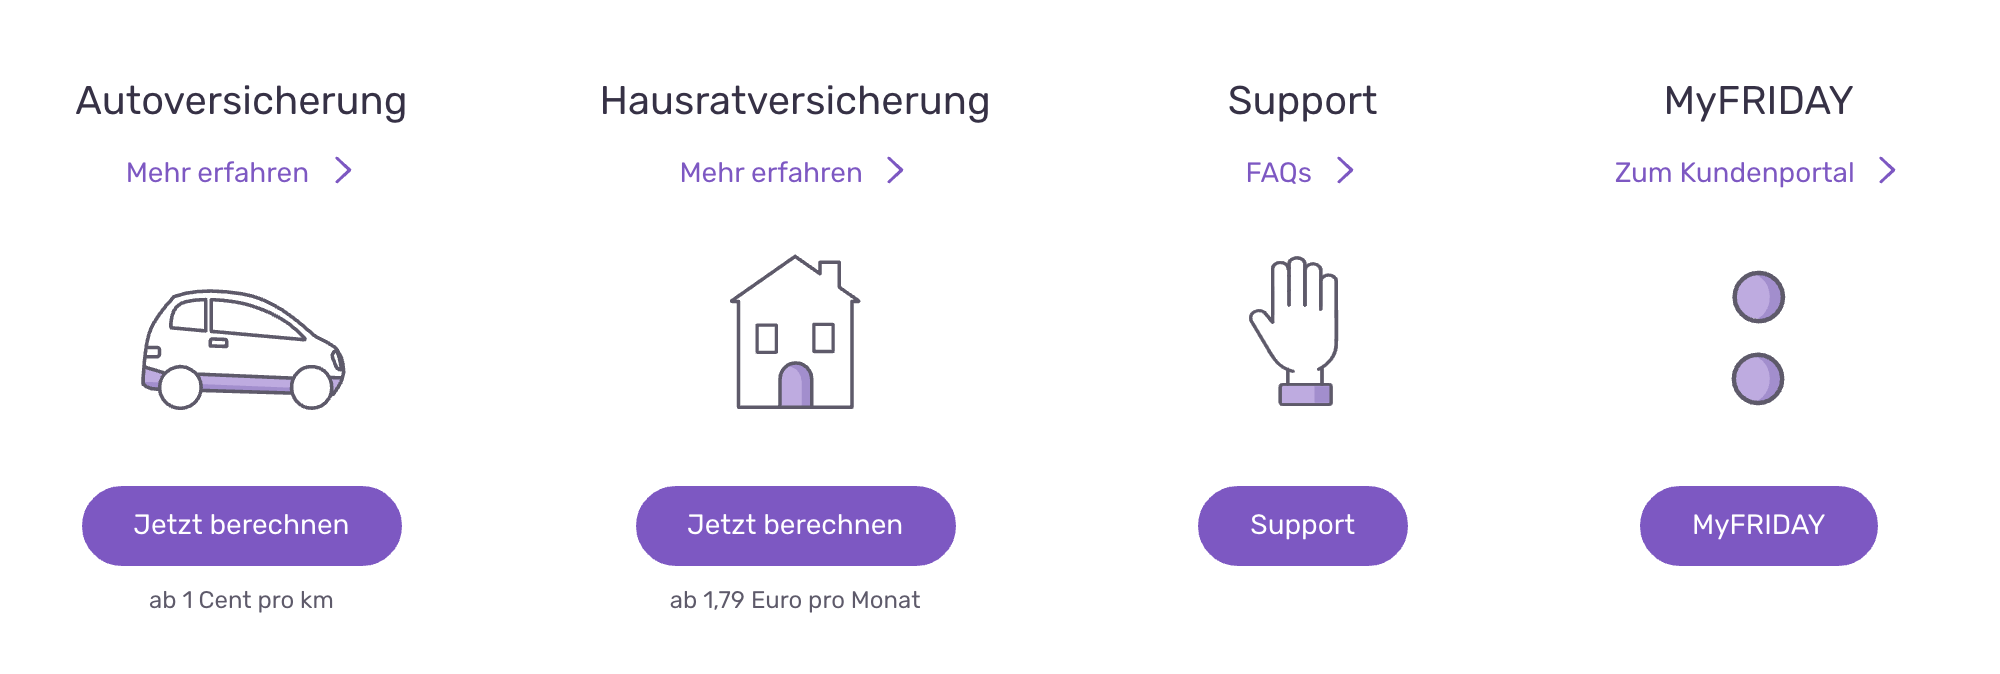
It’s important that the sections work independently and are responsive (i.e. work on mobile). It makes it a breeze for content managers to create new lead pages that’ll look pretty and work smoothly on any device.
At the smallest breakpoint this component turns into a vertical list and loses the link under the title and the CTA button. The title itself becomes the link.
This following one has a subtitle, title, call-to-action button and a large right aligned image.

At a smaller breakpoint you still have all elements, but the content becomes centered and the right aligned image stacks on top.

A react implementation of the above section component could be used like this:
Simplified example:
   <PromoSection
  image={carOnYellowCircle}
  title="This is the title"
  subTitle="This is the subtitle"
  link={{ text: "Text on button", to: "/cool-promotion" }}
/>
But the content managers don’t write React, they’ll only touch a Content Management System and our choice of CMS was Prismic.io .
Create a dynamic page structure in Prismic.io
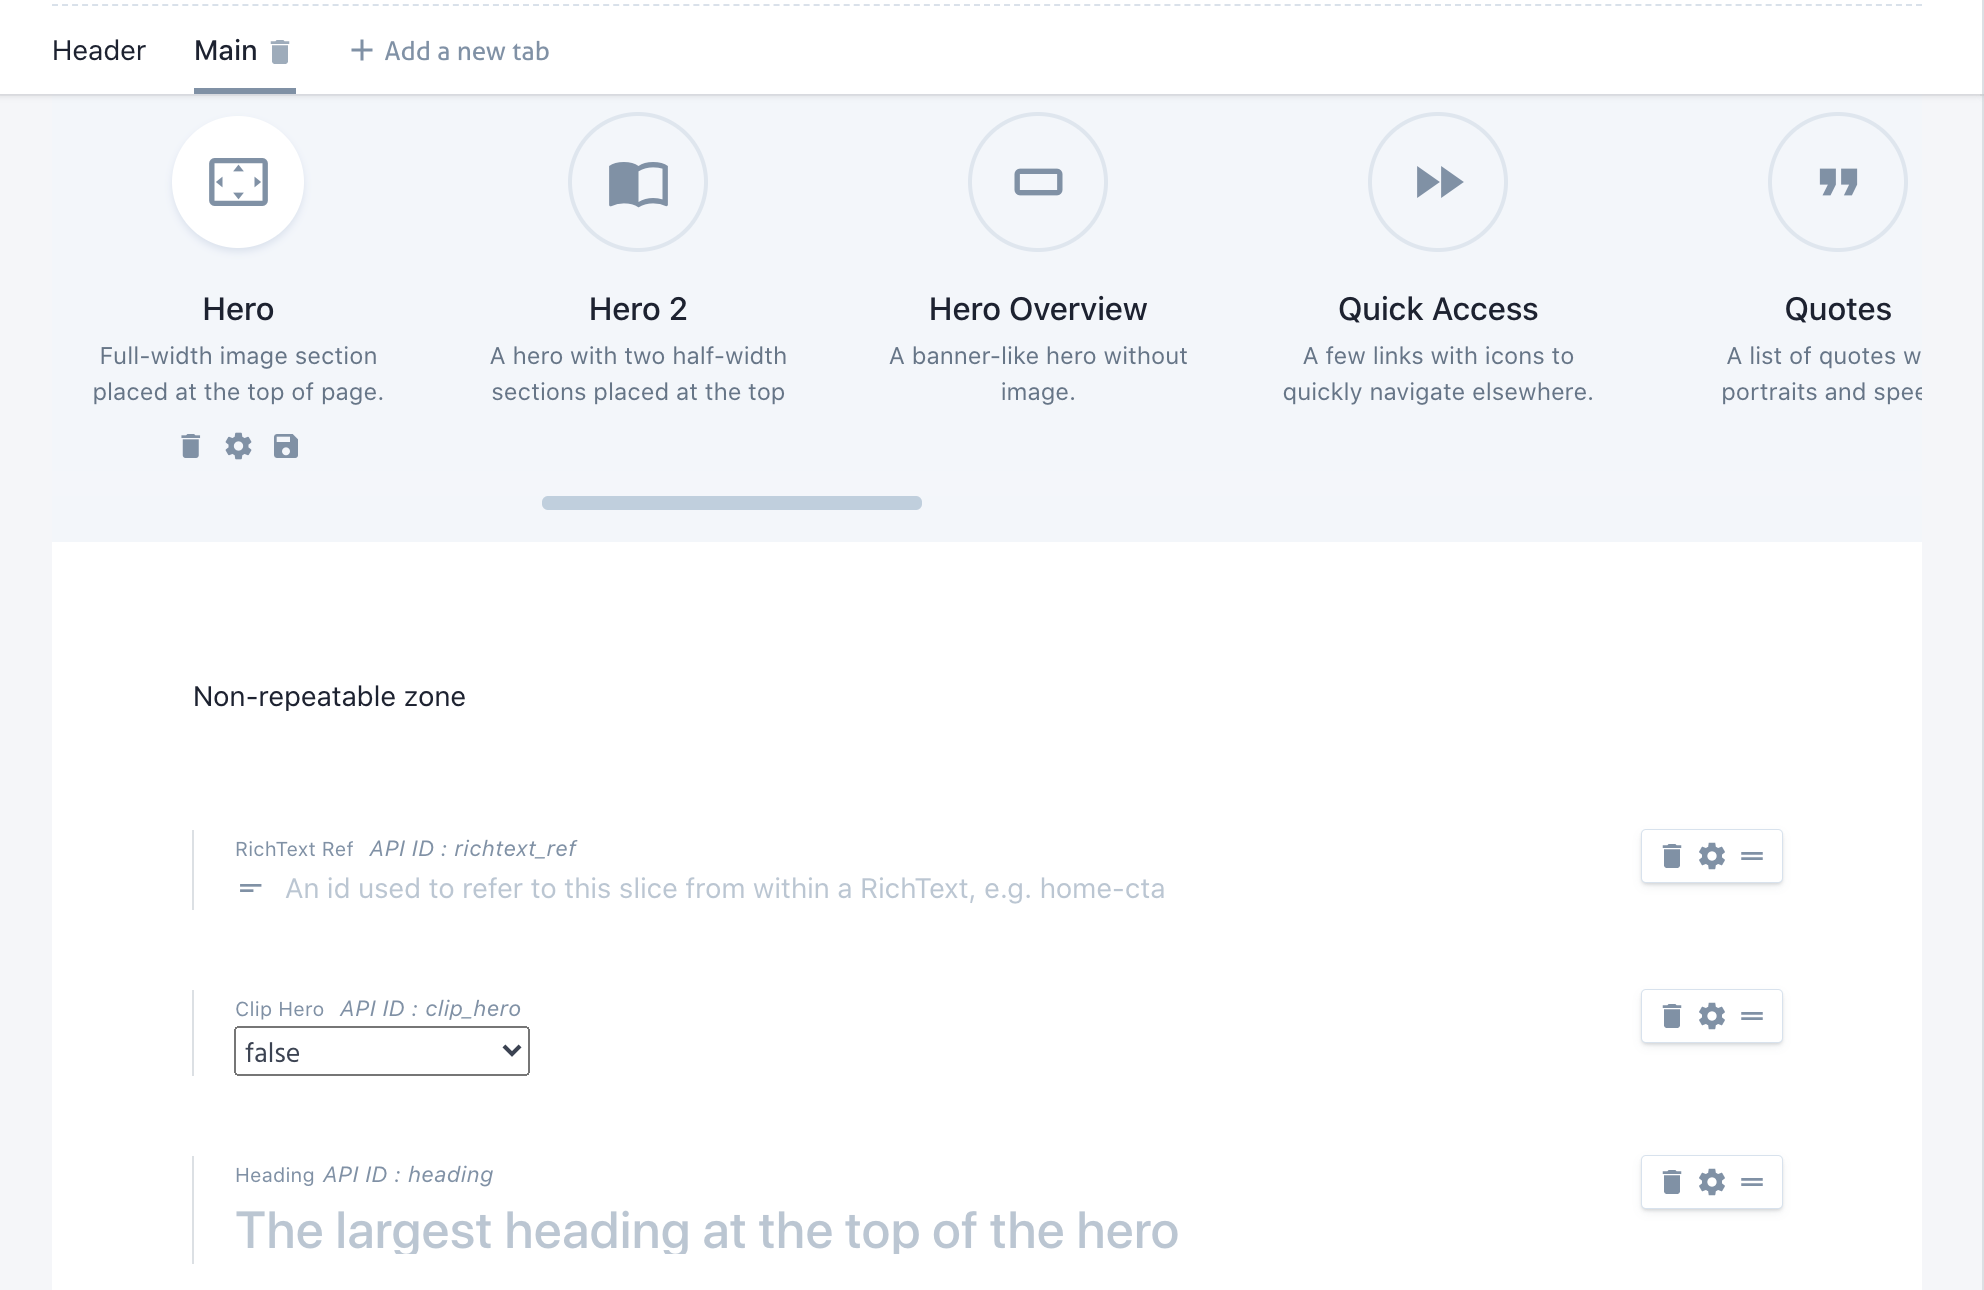
To enable content managers to create arbitrary pages in Prismic we created a repeatable custom document type, called Dynamic Page, within which we enabled the slice zone. For organizational purposes it had a header tab for title, url path and page metadata, and a main tab for the sectional content in the slice zone. You’ll see there’s a selection of various slices defined. Each of these would correspond to a section which will be implemented as React components.
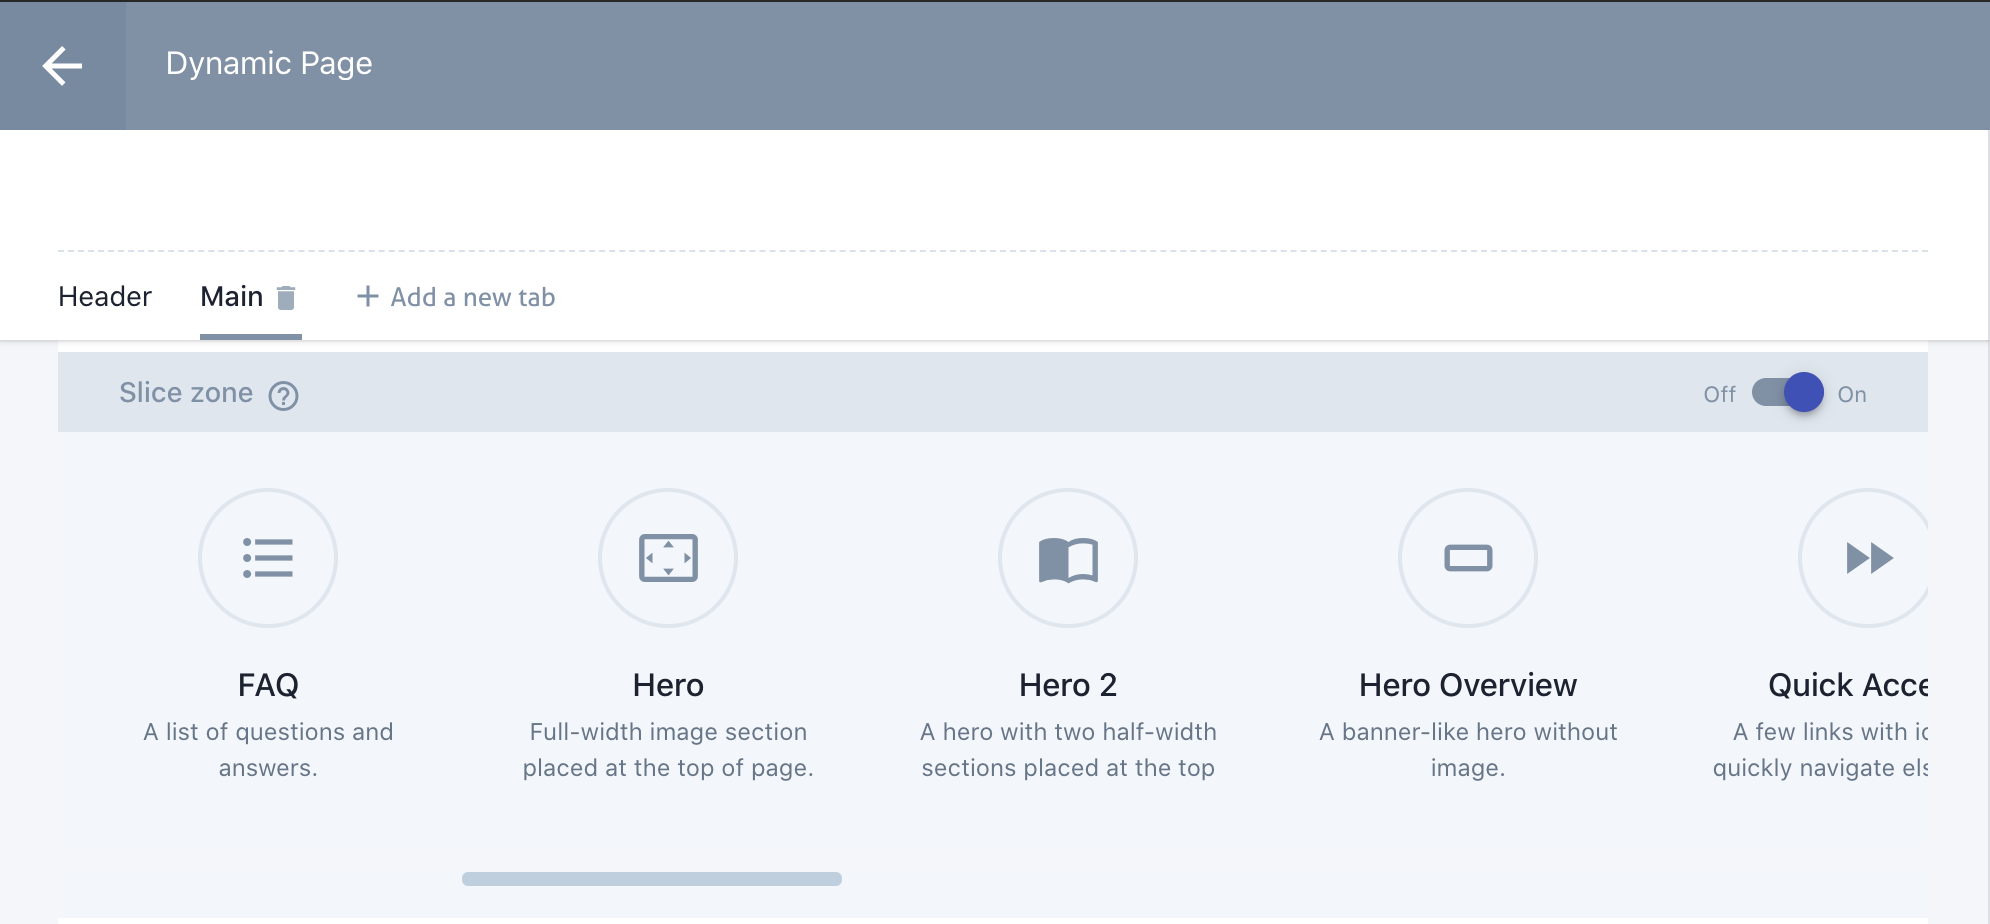
Each slice has their own set of attributes needed to render the corresponding React component. Below you can see the first few properties of the Hero slice of Friday.de .
With the Dynamic Page type, and the slices one can use in that type, it’s possible to create any page possible by stacking sections with various configurations on top of eachother.
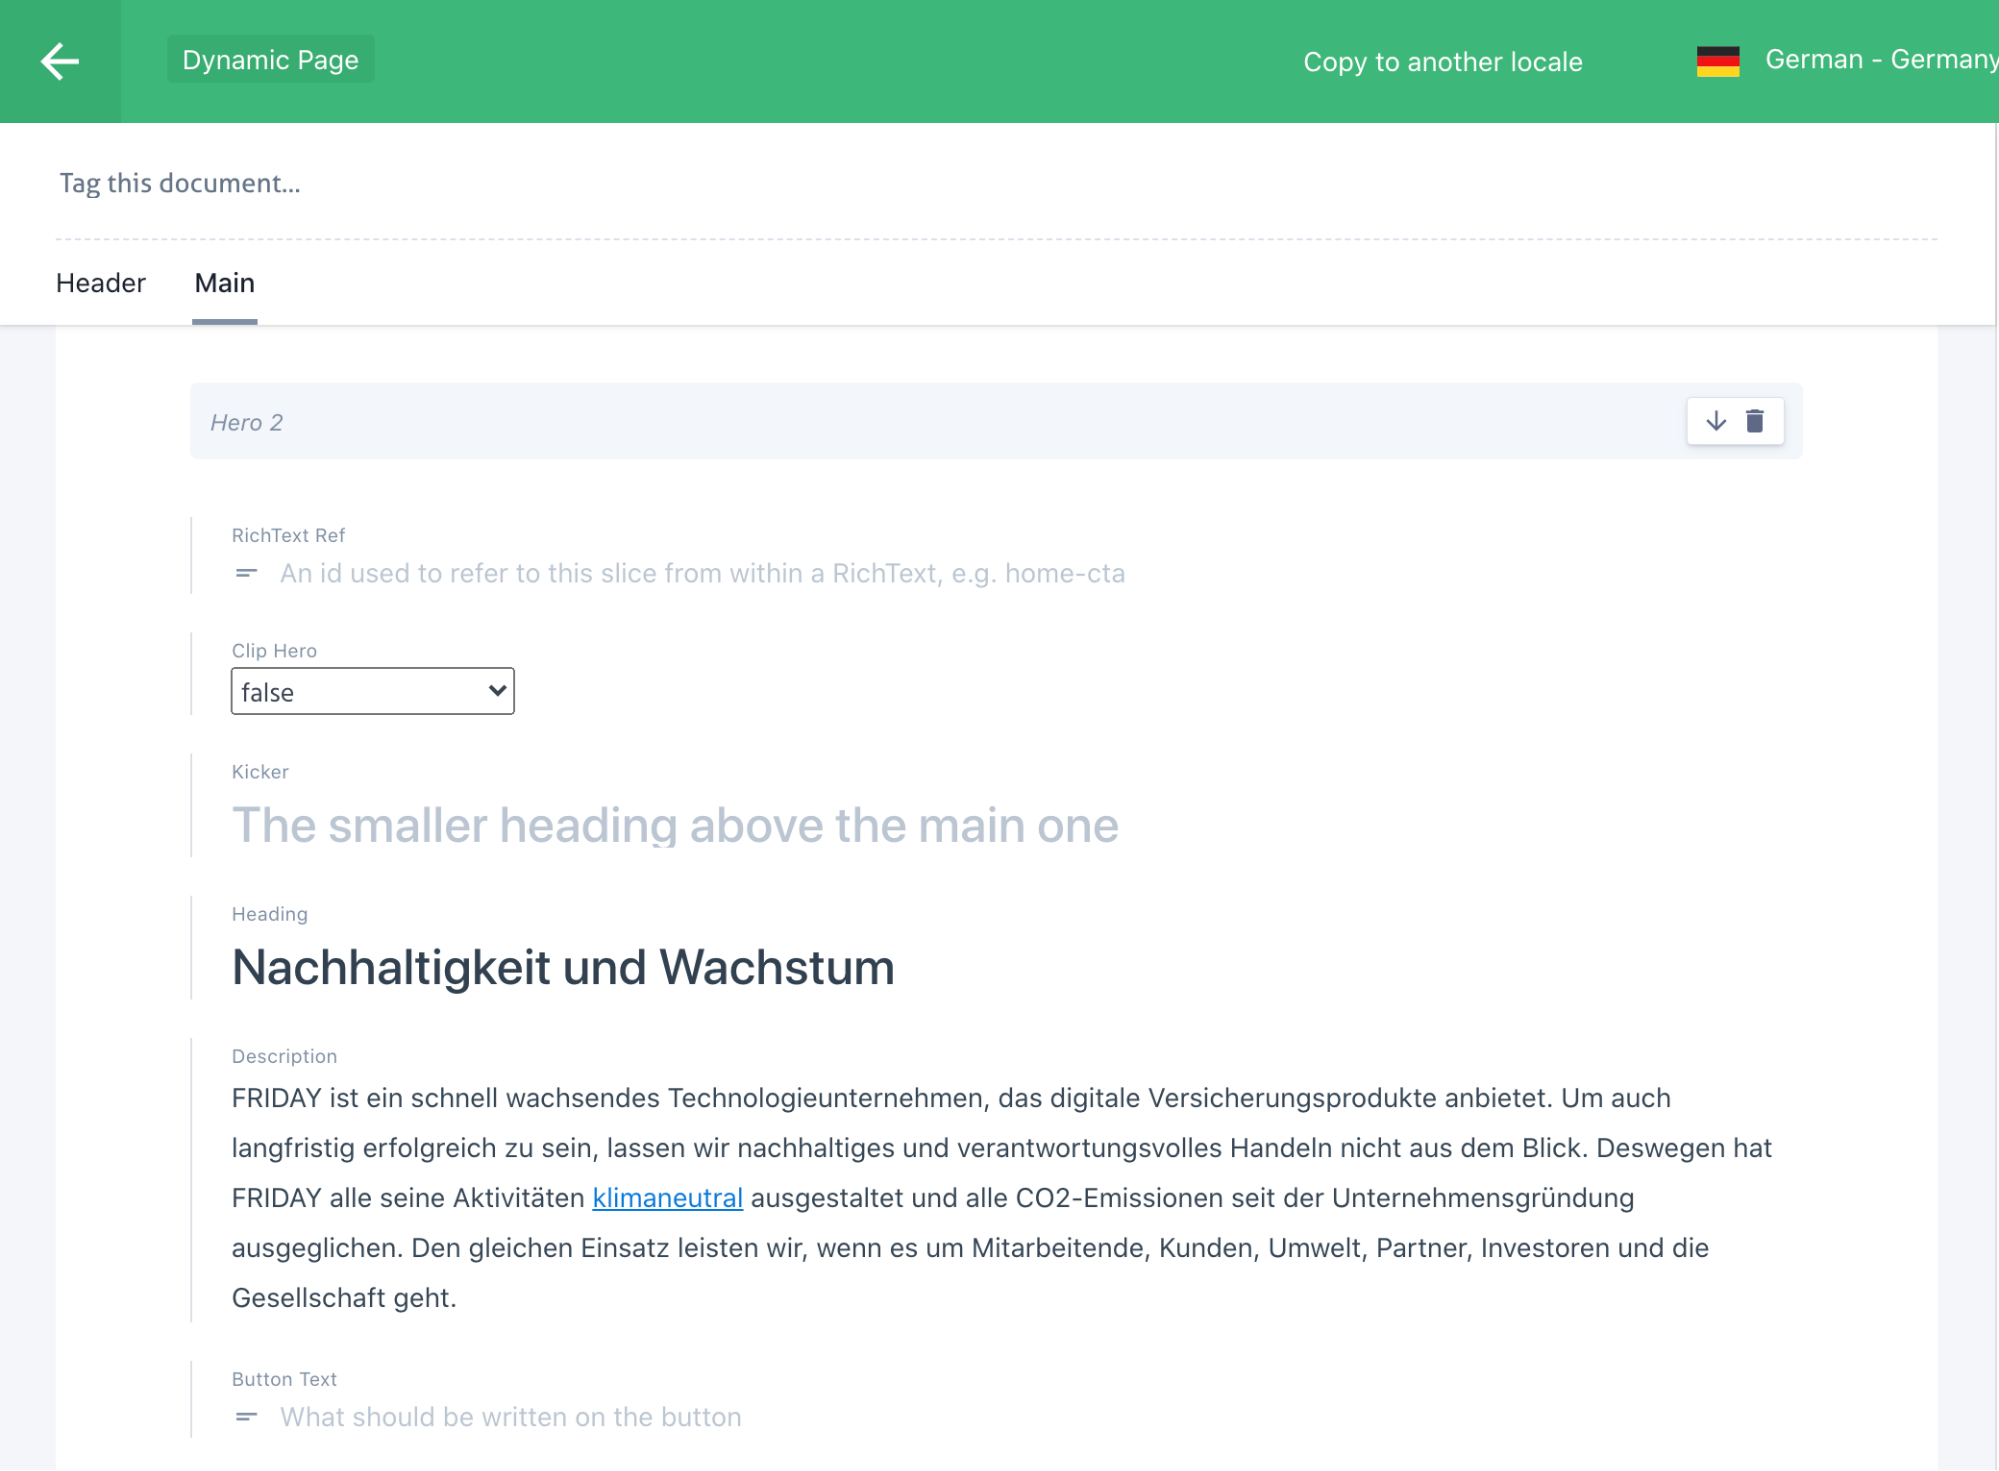
Below is an example document of the Dynamic Page type, and the initial Hero 2 slice used in that page.
With the proper structure and types in Prismic, and React components corresponding to each slice/section, the last piece of the puzzle is building the website using a static site generator, which in this case was GatsbyJS.
GatsbyJS is a static site generator, which means it’ll create the website as static html files. There’s a lot more to it but it’s all you need to know for now. The basic deploy process when publishing in Prismic would look like in the diagram below.
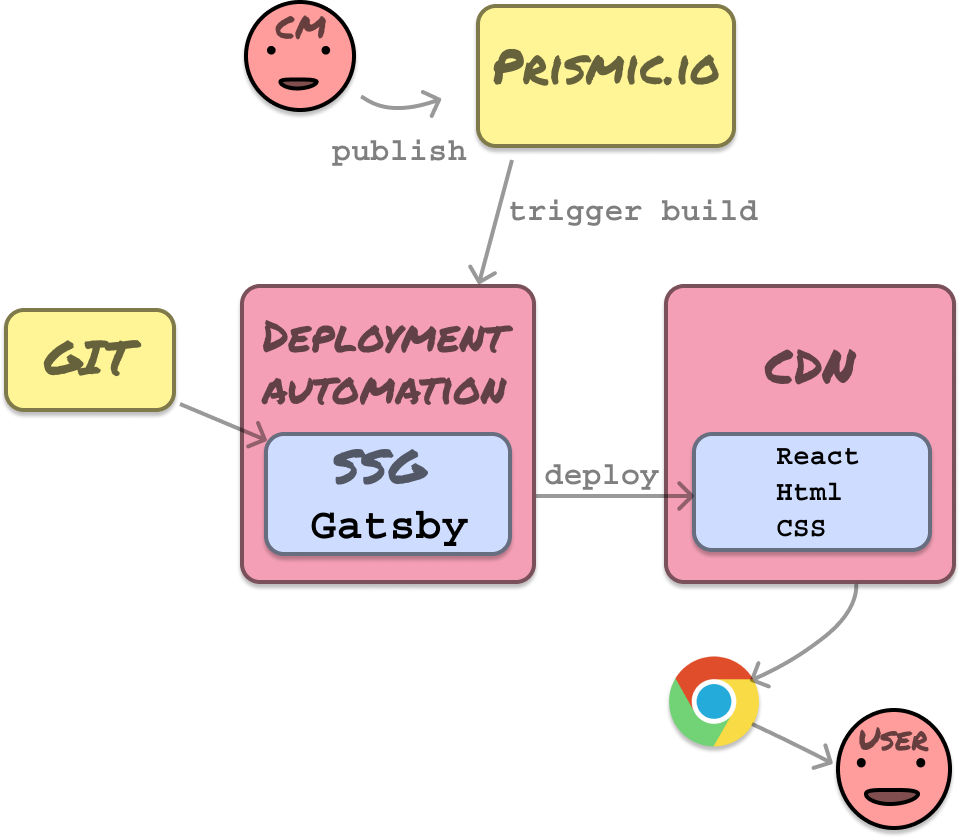
Gatsby has a lot of plugins, to enable it to read from data from different sources, including Prismic. What we did was make GatsbyJS read the content from Prismic, and then feeding this into page templates it created a fully static website, which was uploaded to s3 to be served via a content delivery network.
The details are rather nitty gritty so I won’t dive deep, but for the technically inclined I’ll give some tips.
GatsbyJS with Prismic.io integration
For basic integration from GatsbyJS to Prismic I recommend the official GatsbyJS documentation from Prismic.io .
Define a mapSliceToProps function in each Section component
A Slice was a piece of content we put in the slice zone in the Dynamic Page. Prismic has an intro on how to utilize slices for dynamic layouts . Each Slice corresponds to one Section.
A Section is a React component representing a website page section, that defines a mapping function which translates the Slice properties to its React props. This way the transformation of slices into React props is co-located within the React component it corresponds to.
Example Typescript & React component interface:
  export interface Section<P> extends FunctionComponent<P> {
  mapSliceToProps: (slice: Slice) => P
}
Example Section (simplified):
  export const Hero: Section<HeroProps> = ({ image, heading, button }) => (
  <BackgroundImage src={image}>
    <Container>
      {heading && <RichText text={heading} />}
      {button && <Button to={button.to}>{button.text}</Button>}
    </Container>
  </BackgroundImage>
)

Hero.mapSliceToProps = (slice) => ({
  image: slice.primary.hero_image,
  heading: slice.primary.heading,
  button: slice.primary.button_text && {
    to: slice.primary.button_url,
    text: slice.primary.button_text,
  },
})
Building the dynamic page template
For dynamically created pages you create a page template, e.g. /src/template/dynamic-page.tsx
Within this file you can maintain a map of slice types to React components
Simplified example:
  const sliceMap: { [p in SliceType]: Section<{}> } = {
  banner: Banner,
  hero: Hero,
  hero_2: Hero2,
}
In your render function you’d traverse the slice data and render them as R eact components.
Simplified example:
  export default ({ data }) => {
  const node = data.prismic.dynamic_page || { body: [], metadata: [] }
  return (
    <Layout>
      {node.body.map((slice: Slice, index: number) => {
        const Component = sliceMap[slice.type]
        const props = Component.mapSliceToProps(slice)
        return <Component key={index} {...props} />
      })}
    </Layout>
  )
}
The GraphQL query for the page template should fetch all of the data that Dynamic Page could possibly use, and all of the slices contained within its body and all of their properties. The GraphQL schema depends on the plugin you’re using, but the general idea remains the same.
Simplified example:
  export const query = graphql`
  query DynamicPageQuery($uid: String!) {
    prismic {
      dynamic_page(lang: "de-de", uid: $uid) {
        page_category
        _meta {
          ...Meta
        }
        metadata {
          description
          share_image
          title
        }
        body {
          ... on PRISMIC_Dynamic_pageBodyBanner {
            type
            primary {
              heading
              button_text
              button_url {
                ...Links
              }
            }
          }
          ... on PRISMIC_Dynamic_pageBodyHero {
            type
            primary {
              heading
              hero_image
              button_url {
                ...Links
              }
            }
          }
        }
      }
    }
  }
`
The final technical details
One last thing, you’ll need to implement a custom link resolver to make sure the internal linking structure defined in Prismic is resolved to the proper internal links, and you need to configure your prismic plugin in gatsby-config.js to use your page template (dynamic-page.tsc), the link resolver and relevant graphql fragments. These topics are better covered in the official docs .
Conclusion
These tips should put you on the right track for a maintainable architecture for a website builder on top of Gatsby.JS and Prismic. You could cook up a similar solution using NextJS as well, most of the general advice above applies. I also want to mention SliceMachine , which is a free set of tools/libraries implementing a similar sort of architecture. The first release supports NuxtJS (Vue) and NextJS, but a GatsbyJS version is coming soon.
:format(webp))
:format(webp))
:format(webp))
:format(webp))