Introduction
There are two options you have when you want to setup continuous integration and deployment in gitlab. The first is to use gitlab shared runners, which affords you up 2,000 free ci pipeline minutes in a month. If this is enough for all your projects, then you are lucky, but if not, you have to scale your plan to get more minutes.
The other option entails setting up your own gitlab runner. Gitlab makes the process seemless as it integrates very well with Google Cloud Platform, as well as AWS. With few clicks in the setup dashboard, you can setup and deploy gitlab runner in a Google Kubernetes cluster or Amazon.
With how easy and quick this setup is, you will most likely use it, but at the end of the tunnel lies more bills. Your ci jobs are never going to run every minute, so why pay Google or Amazon for minutes you never used?
Part of the problems posed by the above option is the fact that, despite the cost incurred, the clusters still perform very poor, network strength is the most annoying part of it, as some node.js projects for instance can take ages for yarn to successfully install dependencies.
To make it even worse, setting up cache keys will not help as cached files get deleted onces the docker container volume gets unmounted.
What are AWS EC2 Spot Instances
A Spot Instance is an unused EC2 instance that is available for less than the On-Demand price. AWS EC2 Spot Instances let you take advantage of unused EC2 capacities in the AWS cloud.
According Amazon, Spot Instances are available at up to a 90% discount compared to On-Demand prices and you can use Spot Instances for various stateless, fault-tolerant, or flexible applications such as big data, containerized workloads, CI/CD, web servers, high-performance computing (HPC), and other test & development workloads.
This makes spot instances best for our purpose. We need a setup that will just run for the time needed to complete the job. (Just spin it up, run the job, and shut it down), similar to lambdas.
Autoscaling GitLab Runner on AWS EC2
GitLab Runner has the ability to automatically spin up and down VMs to make sure your builds get processed immediately. This, when used with spot instances, can save us up to 90% cost, improve performance with little or no downtime.
For the purpose of this guide, we will need a gitlab account of course and an aws account, as we will be creating resources.
Step 1 - Prepare the Autoscaler Instance
We will need to setup the runner manager instance. This instance does not run jobs, but rather peforms the role of spinning up and down AWS spot instances on demand, that in turn, runs the job. It ochestrates/managers the instances. As this instance needs to run 24/7, we will create a t2.micro linux (ubuntu) instance, which is just enough for this purpose.
To achieve this, we need to create an IAM user (gitlab user) with EC2 (AmazonEC2FullAccess) and S3 (AmazonS3FullAccess) access granted.
Create a gitlab user with AmazonEC2FullAccess and AmazonS3FullAccess granted
Save the generated access key as we will be using it soon.
Create a t2.micro ubuntu instance that will serve as the runner manager instance
Before you create this instance, take your time to study AWS spot instance pricing for various machine types by regions. Study it and decide the region that best fits your budget. Then create this instance in the region of your choosing. For the sake of this tutorial, I am using us-east-2 (Ohio).
Having selected the right region, navigate to EC2 section and launch a ubuntu 18.04 t2.micro instance.
In the configuration options, keep all the defaults and launch.
Step 2 - Install Docker and Docker Machine
Having created the runner manager instance, we need to ssh into the instance and install docker, docker machine and gitlab runner.
In the EC2 dasbboard, select your instance and click connect. A modal box will show up, asking you to setup ssh key with information on how to connect to the instance. Follow the instructions and ssh into the instance.
image showing ssh connected to the ubuntu instance

follow the instructions below to install docker on the ubuntu instance, for more infomation and for other os distributions, see the official documentation .
Update the apt package index and install packages to allow apt to use a repository over HTTPS:
  sudo apt-get update
sudo apt-get install apt-transport-https ca-certificates curl gnupg-agent software-properties-common
Add Docker’s official GPG key and setup the stable repository:
    curl -fsSL https://download.docker.com/linux/ubuntu/gpg | sudo apt-key add -
  sudo add-apt-repository "deb [arch=amd64] https://download.docker.com/linux/ubuntu $(lsb_release -cs) stable"
Update apt package and install Docker
  sudo apt-get update
sudo apt-get install docker-ce docker-ce-cli containerd.io
Install Docker Machine
Installation instructions as taken from the official website . Please consult for more information.
  base=https://github.com/docker/machine/releases/download/v0.16.0 &&
curl -L $base/docker-machine-$(uname -s)-$(uname -m) >/tmp/docker-machine &&
sudo mv /tmp/docker-machine /usr/local/bin/docker-machine &&
chmod +x /usr/local/bin/docker-machine
Step 3 - Install Gitlab Runner
Installation instructions as taken from the official website . Consult for other os types.
Add GitLab’s official repository
curl -L https://packages.gitlab.com/install/repositories/runner/gitlab-runner/script.deb.sh | sudo bash
Install the latest version of GitLab Runner:
sudo apt-get install gitlab-runner
Step 4 - Register a Runner
Having installed all the necessary tools, it is time to register a runner. By registering a runner, we establish a connection between our gitlab host and our runner manager.
There are various ways to register runners in gitlab, it all depends on your use case. Runners can be registered on a project level, or group level. Group level runners are available for all projects in the group, while project specific runners are just for a single repository.
Select the project or group, navigate to Settings >> Runners, expand the runners section, scroll down and grab the registration token shown.
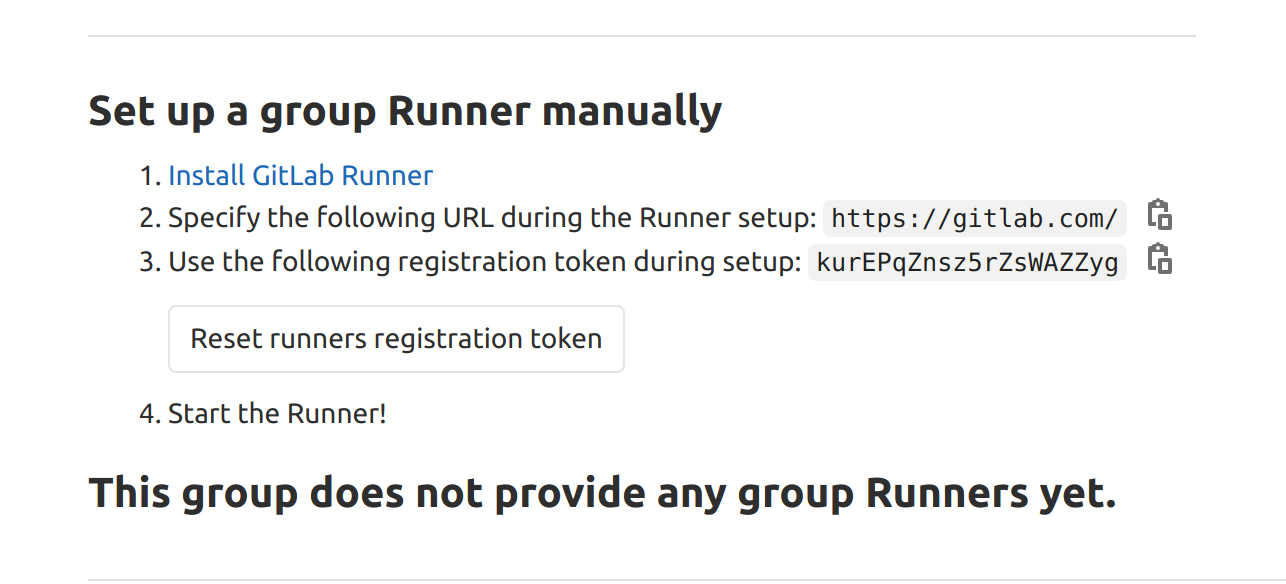
Note: registration tokens containing hyphens tend to be buggy, so make sure you regenerate the token until it contains no hyphen.
With the token at hand, ssh once again to the instance, lets register the runner by running the interactive command:
gitlab-runner register
We will be asked to enter some information, fill in the options as follows.
gitlab cordinator url: this is your gitlab host url. If you are running a dedicated gitlab instance, enter the host url, otherwise use https://gitlab.com .
gitlab ci token: Enter the token you just obtained
gitlab runner description: Enter a description for the runner. Something like what the runner does should be fine
gitlab ci tags: Tags are ways to say, run only jobs that has this tags on them. If this is not what you need, most likely, leave it empty. We can still have it tagged but disable it later in the gitlab ui by setting the run untagged jobs option to true.
runner executor:: For the runner executor. Make sure to enter docker+machine.
default docker image: Specify your default docker image, when a job in gitlab-ci.yml file does not specify an image, this default image will be used.
for more information on gitlab runner registration procedures, as well as how to unregister runners, check out the official documentation
Step 5 - Configure the Runner
Having registered the runner, it is time to configure the autoscaling features. This is where the final work is. Note also that you can register multiple runners by following the steps above. All you need is to get the targt project or group registration token.
In ubuntu, gitlab-runner configuration settings are saved and located at /etc/gitlab-runner/config.toml. Ssh once again into the ubuntu instance and fire up nano editor on this file. Here we will configure how the runner ochestrates and spins up and down aws ec2 spot instances.
sudo nano /etc/gitlab-runner/config.toml
Note: The gitlab runner must have network connection with every ec2 instance that it needs to create. To ensure that this need is met, we need to launch ec2 instances within the same vpc, utilizing any of the subnet network groups.
Once you fire up the editor, you will see an entry for the registered runner. This was created by gitlab when we first ran gitlab-runner register. We will edit this default configuration to our taste.
Visit gitlab's official documentations for more information of all the configurations options for gitlab-runner.
For easy of explanation, I will paste the full list of configuration options here, and then do a walk through of each option
  concurrent = 4
check_interval = 0

[[runners]]
  name = "gitlab-runner-autoscaler"
  url = "https://gitlab.com"
  token = ""
  executor = "docker+machine"
  limit = 4
  [runners.docker]
    tls_verify = false
    image = "node:12"
    privileged = true
    disable_cache = true
    shm_size = 0
  [runners.cache]
    Type = "s3"
    Shared = true
    [runners.cache.s3]
      ServerAddress = "s3.amazonaws.com"
      AccessKey = "your-access-key"
      SecretKey = "your-secret-key"
      BucketName = "s3-cache-bucket-name"
      BucketLocation = "s3-cache-bucket-name-location"
  [runners.machine]
    MachineDriver = "amazonec2"
    MachineName = "gitlab-ci-machine-%s"
    OffPeakTimezone = ""
    OffPeakIdleCount = 0
    OffPeakIdleTime = 0
    IdleCount = 0
    MachineOptions = [
      "amazonec2-access-key=your-access-key",
      "amazonec2-secret-key=your-secret-key",
      "amazonec2-region=us-east-2",
      "amazonec2-vpc-id=vpc-0175846a",
      "amazonec2-subnet-id=subnet-dbb6afb3",
      "amazonec2-zone=a",
      "amazonec2-use-private-address=true",
      "amazonec2-tags=gitlab-runner-autoscaler,gitlab,group-runner",
      "amazonec2-security-group=launch-wizard-1",
      "amazonec2-instance-type=t2.medium",
      "amazonec2-request-spot-instance=true",
      "amazonec2-spot-price=0.05",
      "amazonec2-block-duration-minutes=60"
    ]
Global Section
the global section defines rules that applies to all runners. check_interval defines the time interval in seconds at which gitlab runner communicates with the gitlab host to check for new jobs. defaults to 3 if not given. concurrent defines the maximum number of jobs that can be run concurrently by all runners put together. 0 means unlimited.
Runners Section
Each runner you register is listed in the [[runners]] section. This is what we see above. There are different executor types for gitlab-runner, but for us, we are interested in docker+machine, specified during the registration process.
limit defines the number of jobs that can be handled concurrently by the runner (also called token by gitlab). It can be equal to or less than the concurrent global option.
Runners.docker Section
This section configures the docker container. We disable volume cache since this will never help us because docker volume is lost once the build completes and ec2 instance is shut down. We will specify s3 as our cache location in the next section. [disable_cache] disables docker volume cache.
Runners.Cache Section
Here we configure how the runner handles cache. Caching is necessary to speed up our jobs. We will be using s3 for cache, since the docker volume gets deleted once a job completes. We disable volume cache, and instead, specify s3 as our cache location.
We also provide necessary access and secret keys, as well as bucket name and location to the runner. Here, you specify the access key and secret key you created earlier in the tutorial. Also create a bucket. Name can be cache.your-domain.com.
The Shared configuration is very important, as this enables/disables cache sharing between runners.
Runners.machine Section
Here we configure the machine to be used for running the jobs. Most of the sections are self explanatory. But here are the key notes. Provide the previously created aws access and secret keys for amazonec2-access-key and amazonec2-secret-key respectively.
amazonec2-region specifies the region where the ec2 instance will be setup. Like I said earlier, take your time to study aws spot instances available in their various regions, and the bidding price using the link here .
Note on Networking
The runner manager instance (gitlab in the t.micro instance) needs to have network access to the region where the machines will be provisioned. The network configuration fields, (amazonec2-vpc-id, amazonec2-subnet-id, amazonec2-zone and amazonec2-security-group) are specifically for this. Here we setup the networking portion for our spot instances.
To ensure that both the gitlab runner manager instance and the spot instances can connect within the same network, I suggest you run both instances in the same region and within the same network group.
Go over to your micro instance in the aws dashboard and pick up values for amazonec2-vpc-id, amazonec2-subnet-id, amazonec2-zone and amazonec2-security-group as follows:
Select your instance in the dashboard, locate the security group on the description tab at the bottom. You will also see the availability zone on which the instance is running on. The name of the security group is the value for amazonec2-security-group
click on the security group to navigate to the group dashboard for more details. pickup the vpc id, this is the value for amazonec2-vpc-id
On the side panel, select Virtual Private Cloud (VPC), and navigate to subnets. this will list all the avialable subnets with entries for the owner vpc. At the minimum, you will have 3 avaialable zones (subnet), for the vpc. Select any subnet of your choice, (make sure its owner vpc is the one you picked in step 2). Pick up the subnet id and the availability zone (just the alphabet, between a-f). These values are for amazonec2-subnet-id and amazonec2-zone respectively.
enter the values to the array and that is it.
Notes on Spot instance bidding
Specify the machine type you want to run in the amazonec2-instance-type field. Keep amazonec2-request-spot-instance set to true of course, otherwise it will launch regular, on demand ec2 instance. Specify the maximum amount you are willing to pay per hour in the amazonec2-spot-price. This amount depends on the machine type. I believe you must reviewed accordingly using the link above.
amazonec2-block-duration-minutes specifies the maximum number of minutes your instance needs. You are only charged for the used minutes and not the number specified here.
That’s it! Thanks for reading.
Looking for support from a Javascript development agency ?
Let's talk!
:format(webp))
:format(webp))
:format(webp))